Age
2 years and up
Duration of activity
Your child can play games with their character magnets for just a few minutes, but this activity can also last for up to an hour, especially for older children who will enjoy making up complex stories.
Materials/equipment
There are 3 versions of these, pick the one which best suits how crafty you are, but all result in quality character magnets. The more complex ones will just be a bit neater.
Super quick, easy character magnets
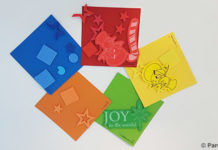
- Set of ‘fuzzy’ stickers. (These are stronger and last longer than paper stickers without the need to laminate etc)
- Recycled card magnets (the thin flexible magnets that often show up in your letterbox attached to real estate calendars and politicians’ campaign materials). How many magnets you need depends on the size of both your characters and the magnets. (You can also buy new A4 or A3 magnet sheets online with adhesive backing).


Basic character magnets
- Recycled card magnets (the thin flexible magnets that often show up in your letterbox attached to real estate calendars and politicians’ campaign materials). How many magnets you need depends on the size of both your characters and the magnets. (You can also buy new A4 or A3 magnet sheets online with adhesive backing).
- Stickers or pictures of your child’s favourite characters. There are lots of places you can get pictures of popular characters free or very cheaply. For example, check out advertising material from toy shops or the cinema, find the pictures online and print them or buy a pack of character stickers or a second hand book to cut up (just make sure your child does not see you cutting the book!). If you’re creative you could even draw the characters yourself.
- All-purpose glue.
- Paint (optional)
- Scissors
- Laminating pouches and a laminating machine (optional).
- Heavy books as weights
Mounted character magnets
- All items listed above.
- Paint (optional)
- Ply wood for mounting the magnets. If you want to mount the magnets on ply wood, it will take a bit longer to prepare this activity, but if you have the tools you need to do it at home, it’s a good idea. The character magnets will last longer but they will also be easier for your child to lift off the magnetic surface.
Cost
If you make a set of character magnets using recycled materials, this activity may cost you nothing.
If you choose to make them from new materials:
- glue costs about $5-$10 from a hardware shop.
- Packs of character stickers usually cost $2-$3 per sheet.
- You can buy an A4 laminating machine and pack of 25 laminating pouches for $20.
- 1m2 of plywood 1cm thick will cost around $10 from the hardware store (and you would have to make hundreds of magnets to need that much wood- team up with another crafty parent and split the cost).
- Magnetic sheets cost $10 per A3 sheet (bought online).
Preparation
Super quick, easy character magnets
- Stick your fuzzy stickers onto the magnet.
- Cut out and start playing!
Basic character magnets
- Collect enough magnets to make a set of characters.
- Optional: if your stickers have thin arms etc that will be difficult to cut around, you may want to paint your card magnet (in white or another colour) so that the original colours or advert on your recycled magnet does not show through. Leave to dry.
- Find a nice picture of each of the characters you want to include in the set. Try to find pictures that are the right size in proportion to each other. Cut out the pictures, unless you are using stickers which don’t need cutting.
- Optional: If you want to laminate the pictures (it’s not necessary but they will last longer if you do) lay out each picture or sticker in the laminating pouch. Run through the laminating machine and then cut around the picture/sticker. You may want to leave a small border around characters if they are small so they are easier for the child to handle.
- Glue each character to a magnet and put under a pile of heavy books. Leave to dry.
Mounted character magnets
- Do steps 1-3 above.
- Optional – paint the plywood so that it matches the colour of the background the magnet will go on – black, green or white and leave to dry.
- Stick the characters to plywood.
- Cut around plywood character.
- Stick the plywood character to the magnet. Leave to dry.
- Cut around character magnet so the magnet is the same size as the wood.
What to do
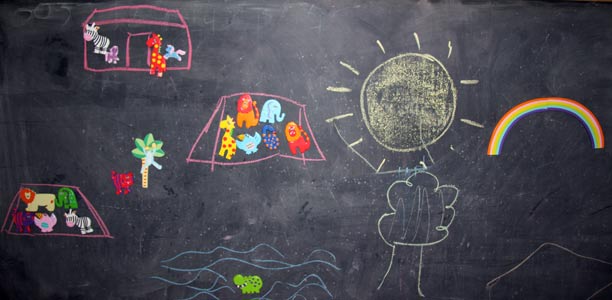
 Use the magnetic characters to role-play/play make believe on any magnetic surface. A magnetic chalkboard is ideal but any magnetic surface will do from the fridge door to the washing machine. Use a cookie tray to make a portable (perfect for the car) role play surface.
- Ask your child to make up a story and act it out using the character magnets. They can move the characters around the surface they are working on.
- As you play, you can help your child learn even more by:
- Encouraging them to use the characters names.
- Talking about events that happen in the story and whether or not the characters acted in appropriate ways. For example, if your child tells a story in which one of the characters hits another in order to resolve a conflict, you could talk about whether or not this is appropriate behaviour and what other things the character might have done to resolve the conflict without hitting.
- Asking about the characters emotions and encouraging them to experiment with new words to describe emotions. Talk about times when they have experienced the same emotions, and the things that make them, for example, happy or upset.
Tips

- Be creative – you may be able to repurpose old toys or decorations for your character magnets. For example, ply wood wall decos, or light plywood mobile which your child no longer uses.
- You can make several sets of characters for your child. For example you could make one set of their favourite cartoon characters and another with their favourite animals. Store each set in snap-lock bags so the pieces of each set stay together.

- Make character magnets of your child’s family and friends, by cutting up photos of their loved ones. Use these instead of pictures of the characters.
- Character magnets are an inexpensive but unique gift idea. Make a set to give a friend for their birthday or Christmas (or just for being a great friend).

- These are perfect to go in birthday party bags – you can make sets of character magnets which suit the theme of your party be it dinosaurs or pirates.
- Have a couple of spare magnets on hand so your child can add characters to the set as they play, for example if they create a story which has a new character in it, they could make a new magnet for that character.
- This is also a great game to play with a group of children. They could take it in turns to tell a story using the characters, or make up a group story in which each child tells a section of the story and takes it in a new direction.
Safety
Young children may try to swallow the glue or small objects (e.g. off cuts from the laminating plastic) while making the character magnets. They should be supervised at all times. Make sure you dispose of any small off-cuts safely.
Extension activities
- For older children who are learning to read and write, make an extra set of magnets with the characters’ names on them. Your child can practice matching the names to the characters, sounding out the names as they do so to develop their reading skills.
Educational outcomes
Communication and social skills
As your child makes up stories about their favourite characters doing things together, they will also be learning about the world around them and their relationships with other people in the real world. They will get a sense of how people are connected to each other and depend on each other for various things. When they talk about what the characters do, they’ll be thinking about social customs (how people are expected to act) and this helps them develop social skills such as sharing and taking turns. Stories are also a great way for children to discuss differences and similarities (e.g. in sex, age, race and culture) and respect and enjoy the differences, as well as the similarities between people.
Your stories may involve emotions like happiness, empathy or frustration, and it’s important to encourage them to express these emotions in words- it will help them learn to communicate about their own emotions. While making up the story they will be able to nominate different characters to play different roles, and this will help them understand the different roles people play in real life situations, for example at home, at school or out shopping. They may also need to resolve conflicts which arise between the characters (e.g. if one wants to go left and the other right) and this will help them develop strategies resolve conflicts in the real world. By about four years of age children are generally developing the skills they need to resolve conflicts, by negotiating with other children and will probably demonstrate this in their story telling.
Language skills
Telling a story is a great way for your child to develop language skills and expand their vocabulary. As they describe the characters and what they are doing, your child will also be learning new words, practising putting words together in sentences and putting their thoughts in order to tell a story which someone else can understand. By about four years of age your child should be starting to understand that a story has a beginning, middle and end, and be able to tell the story in the correct order.
There are many ways you can use this game to improve your child’s language skills. Help them pronounce difficult words correctly if they struggle, and use simple sentences which your child can understand. For older children you could challenge them, for example to make up a rhyming story. If you are playing with a group of children you could ask them to raise their hands every time they hear a certain word (e.g. one beginning with letter P).
As they tell you their story, ask open ended questions (question that require a long answer and cannot be answered with yes or no) to get them thinking and talking. Ask them to think of other ways the story might have ended, for example by asking, ‘What would have happened if character X did something differently?’ Listening to and answering questions is a fundamental part of conversation and your child will be learning the conventions of having a good conversation as they play this story telling game with you.
Talking about the similarities and differences between the characters is a great way to help your child master using comparative words and phrases. Depending on their age they may be beginning to use simple comparative words like big and small, or mastering the use of more complex terms like short and long and thin and thick.
Literacy skills
Help your child master the art of reading and writing, by assisting them to write the story they tell on a piece of paper. For younger children you will need to do the writing, but you will still be helping them make the connection between written and spoken words. Older children may be able to write the story, or parts of it, themselves. When you have finished writing, read the story back to them, to help them understand that what is written on the page is the story they have just told you.
Creativity and problem solving
Making up stories is a great way for children to express their creativity and solve problems. As they make up their story they are representing a make believe reality in which people (or animals, or whatever the characters are) interact, communicate and behave in different ways. In this make believe world your child is the creative master and can take the story in any direction they wish to. Just like real life, any make believe world is bound to present problems which need to be solved. For example if their story involves one of the characters facing a dangerous situation, they will need to work out what to do to get the character out of danger.
Encourage your child to be creative when making up their stories. They may wish to start telling a familiar story about their character, but could add a new twist to the plot, or introduce a new character to the story. Changing the story and seeing what happens is a great way to help your child understand cause and effect, that is that actions have consequences. As your child grows and develops their story telling skills, their stories will become increasingly complex- make sure you put time aside and provide them plenty of support as they experiment with different ways of telling the story and adding detail to it. The character magnets are a great prop to help your child creatively build a make believe world.
Math skills
Maths is everywhere. Key mathematical concepts which should be mastered in early childhood include counting, recognising shapes, patterns and colours and understanding the concept of size. Talking to your child about the characters and what they do, provides countless opportunities to discuss mathematical concepts. What you discuss with your child will depend a lot on their age, but you could for example talk about the colour of clothes, the shapes of different body parts or the relative size of each of the characters. As they use words to describe things like the time of day, the position of characters in relation to each other (e.g. left or right, above or below) or the distance a character travelled, they’ll also be expanding their mathematical vocabulary.
Fine motor skills
Pulling the character magnets off and putting them back on the magnetic board will help develop your child’s fine motor skills. Every time they use their fingers, they are strengthening the muscles they will use for writing, turning the pages of books and other fiddly tasks.Virginia
References
- Virginia Early Childhood Development Alignment Program. Milestones of child development- A guide to young children’s learning and development from birth to kindergarten. 2009. (cited 26 July 2013). Available from URL Link.
- Queensland Health. Physical and cognitive milestones. 2007. (cited 31 July 2013). Available from URL Link.


 (9 votes, average: 4.56 out of 5)


